Trench Mortars. ANZAC.
The landscape of the Gallipoli peninsula, at both Cape Helles and Anzac, with its succession of hills and ravines, made it ideal for the deployment of trench mortars, but throughout the campaign, the numbers available were totally inadequate. Unlike the Western Front, there is no evidence of local manufacture to relieve the deficiencies, which is not surprising given the total lack of any industrial activity in the region that could have provided the necessary resources.
The Japanese Mortars.
Following the outbreak of the war, the Japanese Emperor offered a small number of medium trench motors to His Majesty King George V as a gift from one fellow monarch to another engaged in war against Germany.[1] As the ships carrying the mortar would have to pass through the Suez Canal, some bright spark in the War Office saw an opportunity to satisfy Sir Ian Hamilton's demands for trench mortars and sought permission to divert them at Alexandria. A War Office telegram attached to the War Diary GHQ Mediterranean Expeditionary Force for May states that two Japanese bomb guns with 1,000 rounds left Japan on 31 March and will be diverted on arrival at Suez. At the beginning of May, Base Alexandria reported the arrival of the bomb guns and bombs to Sir Ian Hamilton and asked if they should be dispatched to Gallipoli.[2] On the same day, ANZAC was informed that they would receive the Japanese mortars as soon as they arrived.
The Japanese medium mortars were another clone of the Krupp medium mortar, similar to the Woolwich 2-inch medium trench howitzer, with a calibre of 75 mm and fired a powerful 14 kg bomb 500 metres. They had not arrived at ANZAC by 19 May when the Turks launched a powerful offensive against the ANZAC positions in an attempt to drive them back into the sea and, in desperate need of the mortars, ANZAC GHQ spent a frustrating day unsuccessfully trying to trace them in the chaotic supply chain that linked the troops on the Peninsula with their forward supply base on Lemnos.[3] Marine Artillery, and immediately rushed up to the firing line where they were used to great effect. After training Australian mortar crews, the Royal Marine Artillery crews were withdrawn.
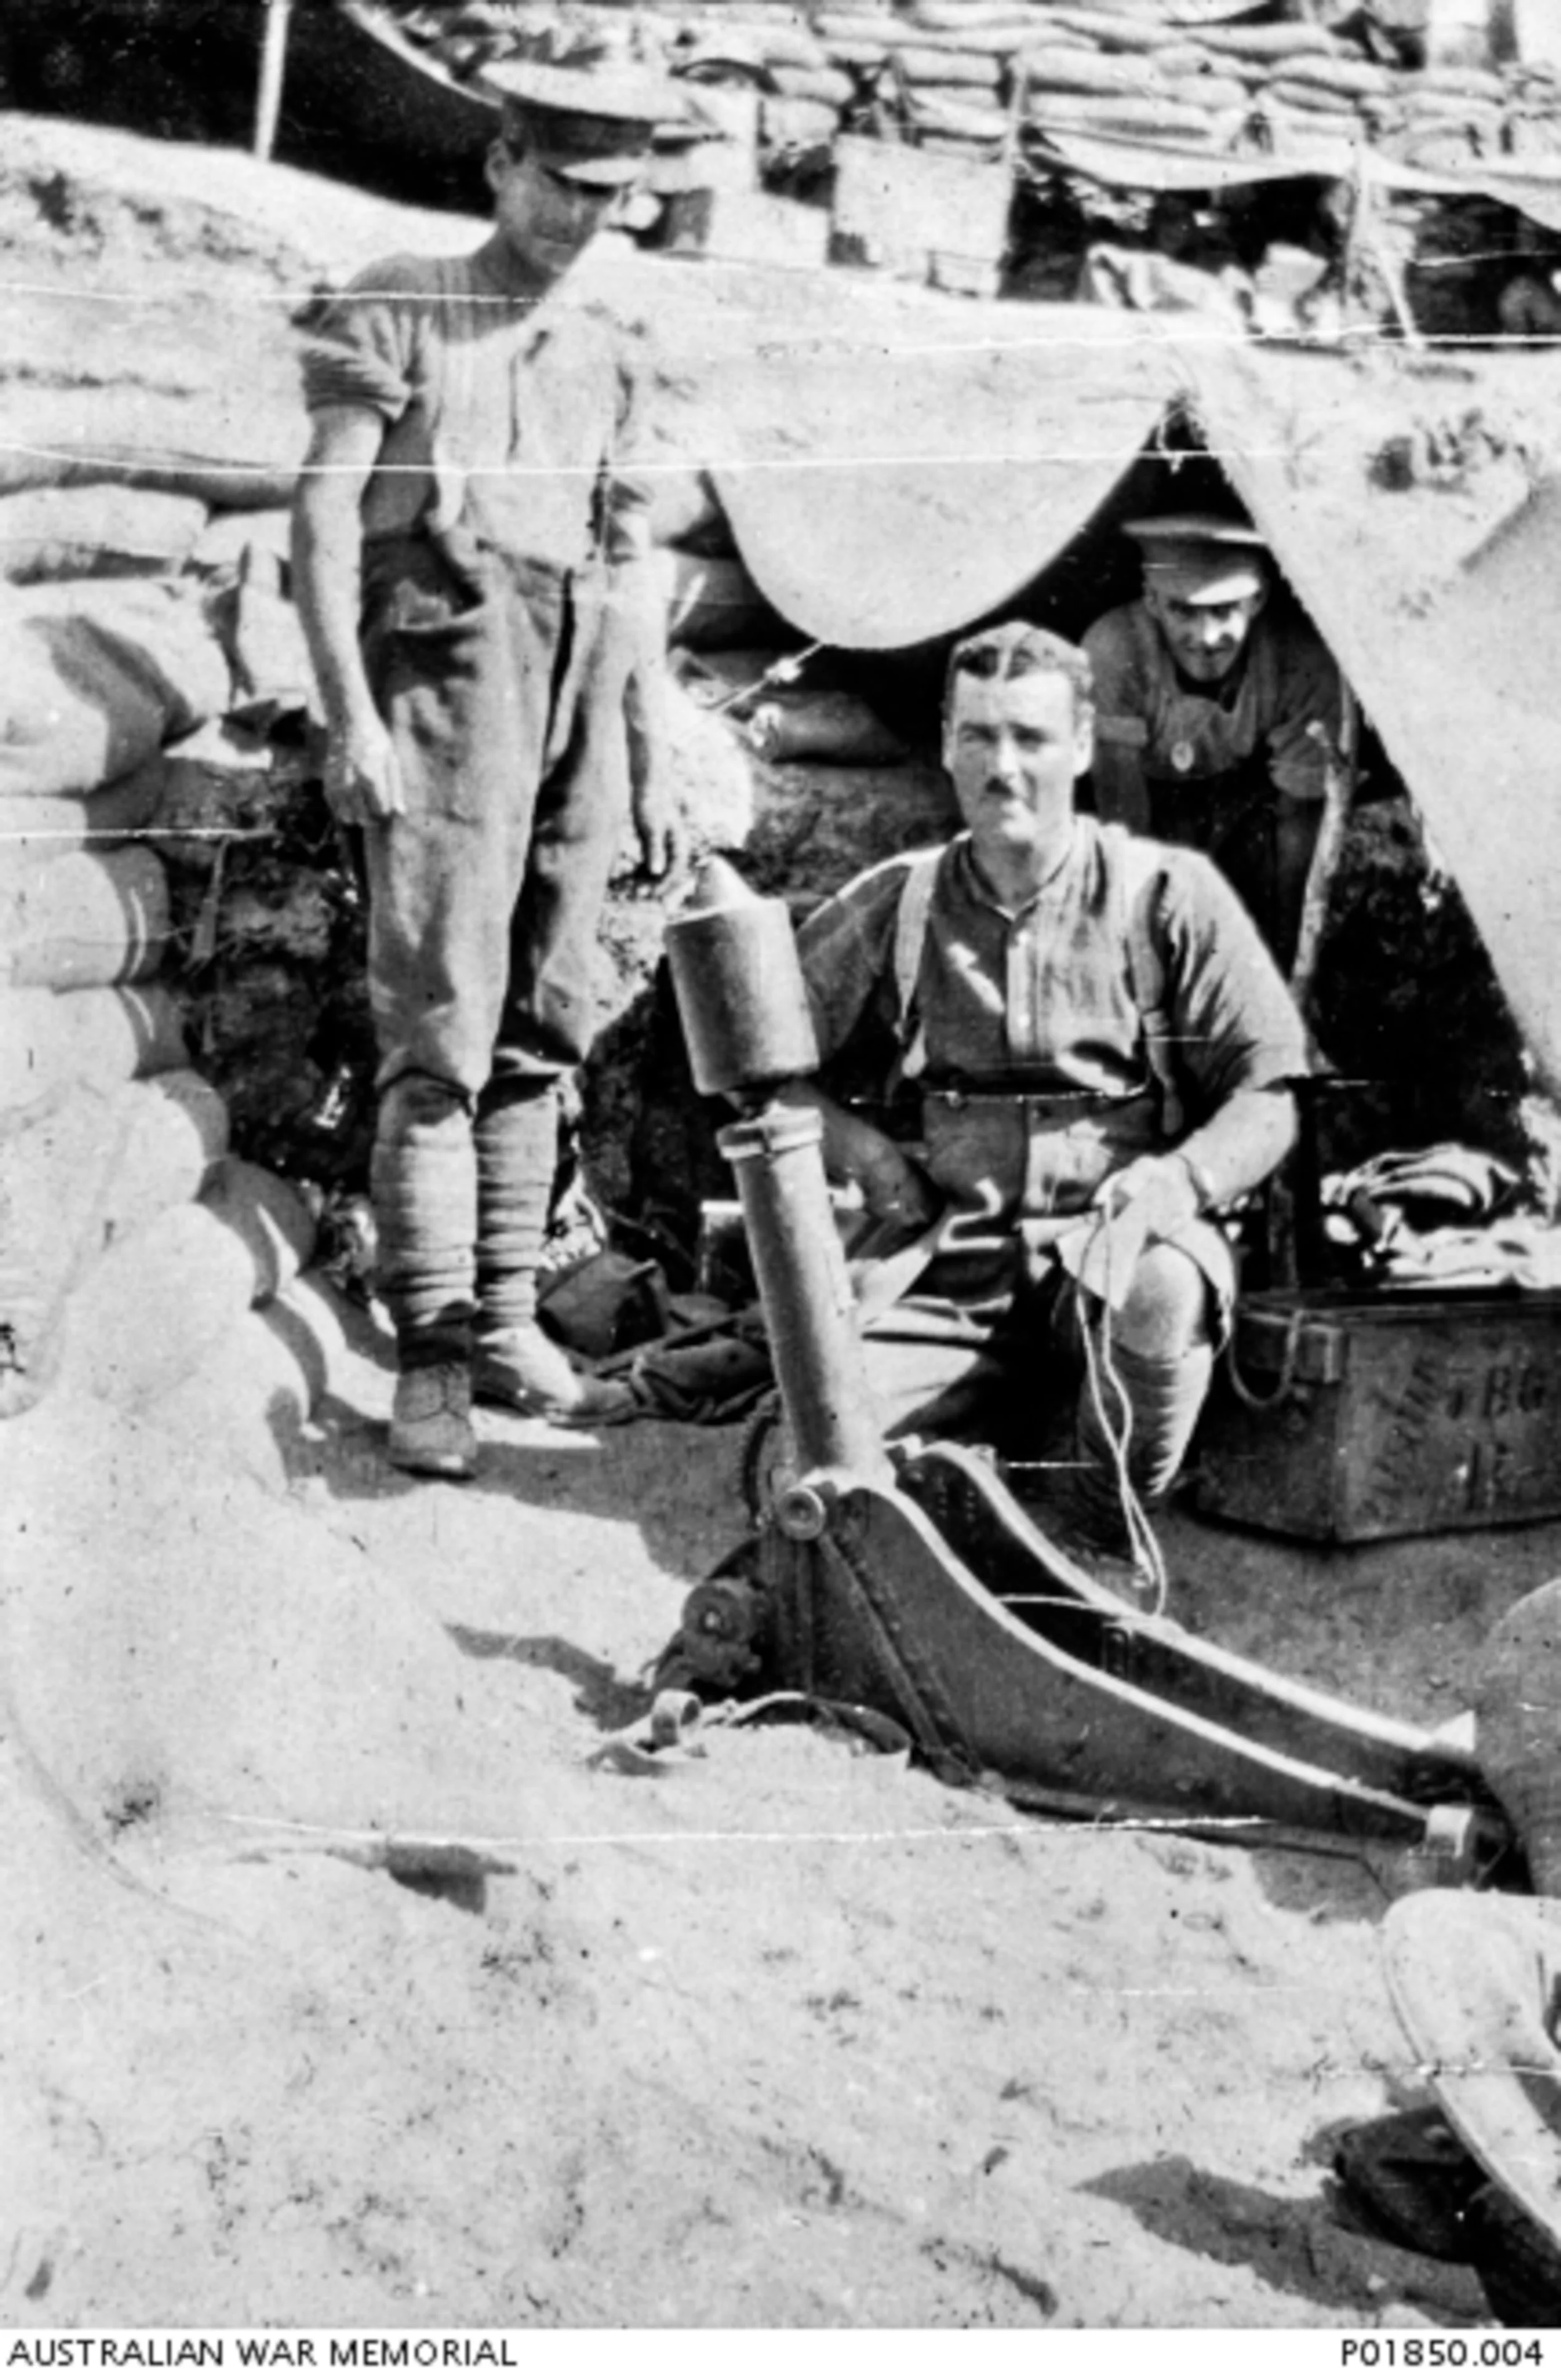
An Australian mortar bomb team preparing to fire a Japanese mortar. The soldier in the centre is holding the firing lanyard. Australian War Museum P01850.004
In total, six Japanese mortars were received, all issued to the ANZAC Corps, two to each Division. The others remained in the Ordnance Store, ostensibly as insurance against accidents or loss, but were probably not issued because of the lack of ammunition. Less than 2,000 rounds arrived with the mortars from Japan, and, as they were a personal gift to the King rather than an order placed by the Master-General of the Ordnance, they seemed to have fallen outside the routine War Office procedures, and no further supplies of ammunition were ordered from Japan, or any arrangements made in Britain for home manufacture. This was a major calamity, as these mortars were among the most effective weapons used by the ANZAC Corps and were essential for the defence of its most vulnerable sections, such as Quinn's and Courtney's posts, Johnston's Jolly and Lone Pine. On July 4th, the 2nd Australian Division was issued with just 25 rounds for each of its two Japanese mortars, with a note stating that no more were available until the end of the month. In the ammunition audit of October 2nd, the Australian 1st Division reported that it had seven Garlands, with 6460 rounds, one 3.7-inch light mortar with 200 rounds, but no ammunition for its Japanese mortars.[4]
Sir Ian Hamilton raged about the lack of ammunition in his diary for 18 June,
The War Office can get no more bombs for our Japanese mortars! A catastrophe this! Putting the French on one side, we here, in this great force, possess only half a dozen good trench mortars - the Japanese. These six are worth their weight in gold to Anzac……………………. And now the W.O. have let the stocks run out, because some ass has forgotten to order them in advance. Have cabled a very elementary question: 'Could not the Japanese bombs be copied in England?[5]
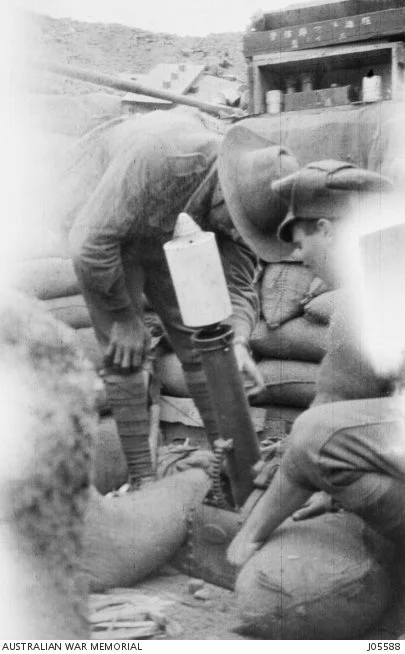
Defiant to the last, the Australians fired their remaining Japanese mortar bombs from a position near Brown's Dip at 4.30 pm on December 20th, the last day of their evacuation.
Firing the last Japanese bomb from a position near Brown's Dip, Gallipoli, at 4.30 p.m. on the day of the evacuation. The kneeling figure is Corporal Stanley Bowman. (Note the Japanese characters on the box in the background.)
After this demonstration, the mortars were transferred to VIII Corps at Cape Helles, where preparations were in hand to train crews. On 7 December 7th, the Brigadier-General Royal Artillery reported to the bombing conference that sufficient ammunition would soon be available, but this was premature, for, as the Director of Ordnance Stores reported on December 16th, he had received 900 Japanese bombs, but they were without their primers, and so presently useless.[6]
The Garland Grenade Thrower.
In response to Sir Ian Hamilton's letter of March 23rd requesting a supply of grenades and trench mortars, Herbert Garland, Superintendent of Laboratories at the Cairo Citadel, developed a small mortar, or grenade thrower. It was constructed from a short length of 65 mm internal-diameter steel tubing and bolted to a strong wooden block at an angle of 45 degrees. Range was adjusted by varying the amount of propellant or by altering the bomb's trajectory by placing the block on a wooden box and adjusting the angle with wooden wedges.
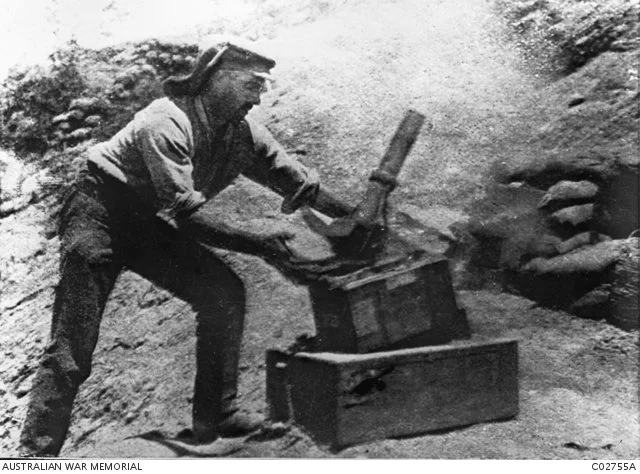
A trench mortar in action on the Gallipoli Peninsula, 1 June 1915. The Garland Bomb thrower used at Quinn’s Post, Anzac. Photo, Charles Bean. Australian War Memorial C02755A.
The ammunition, the Graland bomb, or grenade, could be used both as a mortar bomb or, more rarely, as a hand grenade. It was a short iron cylinder containing a tin box holding an explosive charge of 3 oz of gelignite, the lid of which was drilled to accommodate the detonator sleeve and closed at the bottom with an aluminium screw lid. The cylinder is weighted at the front to land headfirst to trigger a special detonator. The total weight was about two and three-quarters lbs. When used as a hand grenade, a piece of rope or a short handle was attached to the base of the bomb to aid throwing, along with a muslin tail, or streamer, to stabilise it in flight. Initially, this was white and clearly visible, allowing the enemy to move away from the blast area, and in November, VIII Corps began dyeing theirs to make them less conspicuous.[7] Because of its weight, the Garland grenade was predominantly fired as a mortar bomb after fitting a special casing to protect the tail and safety lever from damage from the force of the propellant. These bombs did not slide down the mortar barrel but behaved like spigot mortars after a short wooden tail was attached to the bomb head, which fitted into the mortar barrel, leaving the cylindrical bomb projecting from the top of the barrel.[8]
A member of the 28th Battalion fires a trench mortar in a front line trench on the Apex, Gallipoli. Note the Garland bomb on the wooden platform.
The Garland was the most widely used mortar on Gallipoli, but it is difficult to determine precisely when it entered service. The ANZAC General Staff War Diary has an entry for May 7th reporting that a particularly troublesome Turkish sap was so close that the field artillery had to fire at it over open sights, suggesting the mortars were unavailable, and its adoption may be as late as June 7th when the 1st Australian Infantry Brigade were given two Garlands and eighty bombs for trial and report. They identified several defects attributed to poor workmanship but recommended adopting it as a handy weapon with high destructive power at ranges up to 200 yards.[9]
From June until the evacuation of ANZAC, there are numerous accounts of the employment of the Garland, often in conjunction with catapults, against soft targets such as the enemy saps, machine gun emplacements and dispersing enemy working parties. The Cairo Citadel kept its Garlands well supplied with ammunition, so much so that in November, VIII Corps complained to its Divisions about the large number of Garland bombs accumulating in the bomb park and asked the bomb conference to report on the utility and limitations of this type of mortar. They replied that the infantry disliked the mortar, for although it was accurate and destructive at short ranges, it became wildly inaccurate when the wind blew and at longer ranges under all conditions.[10] This prejudice persisted for, in December, we find VIII Corps still nagging away at its Divisions over the large number of Garland bombs available and pointing out that, as it was the intention to replace these weapons with the 3.7-inch light mortar, it was very desirable that the bombs be expended as soon as possible.[11]
[1] The Japanese navy also offered warships that were deployed in the Mediterranean as anti-submarine escorts.
[2] GHQ MEF: Telegrams. May 1915
[3] For a brief account of the tribulations in providing Ordnance see A Forbes, A History of the Army Ordnance Service. Chap. VI. Gallipoli. (Uckfield: The Naval & Military Press. nd.)
[4] AWM4. 1/42/9. Part I. General Staff. 1st Australian Division. War Diary, October 1915
[5] Hamilton Gallipoli Diary Vol. I, pp. 317-318
[6] TNA: WO95/4306: General Staff. VIII Corps. War Diary, Conference of 7/12/15, and entry for 16 December
[7] TNA: WO95/4306: General Staff. VIII Corps War Diary Appendix. XXXI. Nov.1915.
[8] TNA: WO95/4306: General Staff. VIII Corps. War Diary, May- Sept.1915
[9] AWM4 1/42/5 Part 4: General Staff. 1st Australian Division. War Diary, June 1915. Appendix 9. 7/6/15
[10] TNA: WO95/4306: General Staff. VIII Corps. War Diary. 1915 Oct.-1915 Dec. Appendix XX, Bomb Conference. 15/11/15
[11] A: WO95/4306: General Staff. VIII Corps. War Diary. 1915 Oct.-1915 Dec. Appendix XXII